1. Packing List
The package include the items listed below.
Generally, they are 3 types of items:
- LED strips, 4-pin wires & splitters, and the control module.
1). 4 x 12.7” daisy-chain LED strips
2). 4 x 12.7” single-sided LED strips
3). 4 x 8.7” daisy-chain LED strips
4). 2 x 8.7” single-sided LED strips
5). 4 x 4.7” single-sided LED strips
6). 4 x 1-2 way splitters with fast locking connectors
7). 4 x 1-3 way splitters with fast locking connectors
8). 6 x 24” extension wires with fast locking connectors
9). 1 x DC 12V control box with a kill switch
10). 2 x RF remotes (Key fob + flat remote)
11). 1 x double-sided adhesive for the control box
12). 1 x velcro stickers for remotes
13). 3 x T stripping-free connectors
14). 2 x ring terminals for power supply
15). 1 x instructional booklet
If these items aren’t perfect for your installation, let DITRIO know.
Always more than happy to make your bike glow as you like.
2. Test before Installation
After you unbox the package, test to make sure everything is fine.
- Find a power source with DC 12V (typically the battery of your bike has this voltage)
- Connect the red wire to the positive and the black wire to the negative of your power supply
- LED strips will go on after you press the push button on the control box for the 1st time
After you confirm everything works correctly, simulate installation to see whether wires are long enough.
If you need help, please contact DITRIO.
3. Specifications & Parameters
1). Material for LED strips: Extruded silicone
2). LED model: SMD RGB 5050
3). Input voltage: DC 12V (Workable between 10-15V)
4). Wattage: Maximum 48 watts
5). Warranty: 2-Year limited warranty
6). Control method: RF remotes, effective within 30 ft
7). Working temperature for all parts: 30 °F – 120 °F
A useful tip for estimating real wattage:
- The colors of RGB strips are a combination of 3 lights – red, green and blue.
- The wattage – 48 watts – is the maximum value of all the 240 LEDs when all the 3 colors are working.
Actually, RGB LEDs don’t always run at their peak wattage.
The wattage is the maximum value only when they’re in solid white.
Below are some approximate values based on the rule of thumb.
- The real wattage will be approximately 1/3 of the peak value, when you pick one of the 3 solid colors – red, green & blue.
- The real wattage will be approximately 1/2 – 3/4 of the peak value, when you pick one of the colors besides solid and white colors.
4. Tips for Applying Double-Sided Tapes
It’s not difficult to stick LED strips.
But the adhesion varies depending on how you stick the tapes.
You can use the tips below for obtaining an optimum adhesion.
1). Surface preparation
Clean the bonding surfaces before application.
You can consider a solvent of IPA/water mixture.
- Adhesion promoters significantly improve initial and ultimate adhesion
- You can consider 3M Adhesion Promoter 111, 3M Tape Primer 94
- Ideal application temperature: 70°F to 100°F (21°C to 38°C)
- Minimum application temperature: 60°F (15°C)
- Use a heat gun (hot air gun) to warm up tapes and the target surface if it’s too cold
2). Apply pressure and wait
The double-sided tape is a kind of a pressure-sensitive adhesive.
Therefore, apply pressure for 3-5 seconds after sticking.
This will develop better adhesive contact and improve bond strength.
Better to wait for 24 hours after application before riding again.
The tapes will gain bond strength dramatically.
We’ve got some adhesion data from a technical document.
- 50% of the ultimate strength after 20 minutes
- 90% of the ultimate strength after 24 hours
- 100% of the ultimate strength after 72 hours
5. Water Resistance / Waterproof Grades
Water-resistance varies, depending on a specific part.
1). LED strips (Waterproof, IP68)
Made from extruded silicone, with the highest waterproof rating
2). SM 4-Pin Fast locking connectors (Water resistant)
Better to keep the connectors away from direct water jets
You can enhance the resistance by filling with electrical grease
3). Control box (Resistant to water & humidity)
The circuit board has a layer of conformal coating on its surface
The front and the back cover are sealed with epoxy adhesive
You can expose it if you don’t have anything to cover/hide it
4) Kill switch (Water proof)
The kill switch has a new design of DITRIO, which is waterproof if even you dip it into water
5) RF remotes (NON-water-resistant)
Please keep them away from liquid water and humidity.
6. Wiring Diagram
The conceptual diagram demonstrates the positions & relations among different parts.
It helps you understand how to make install plans for your bike.
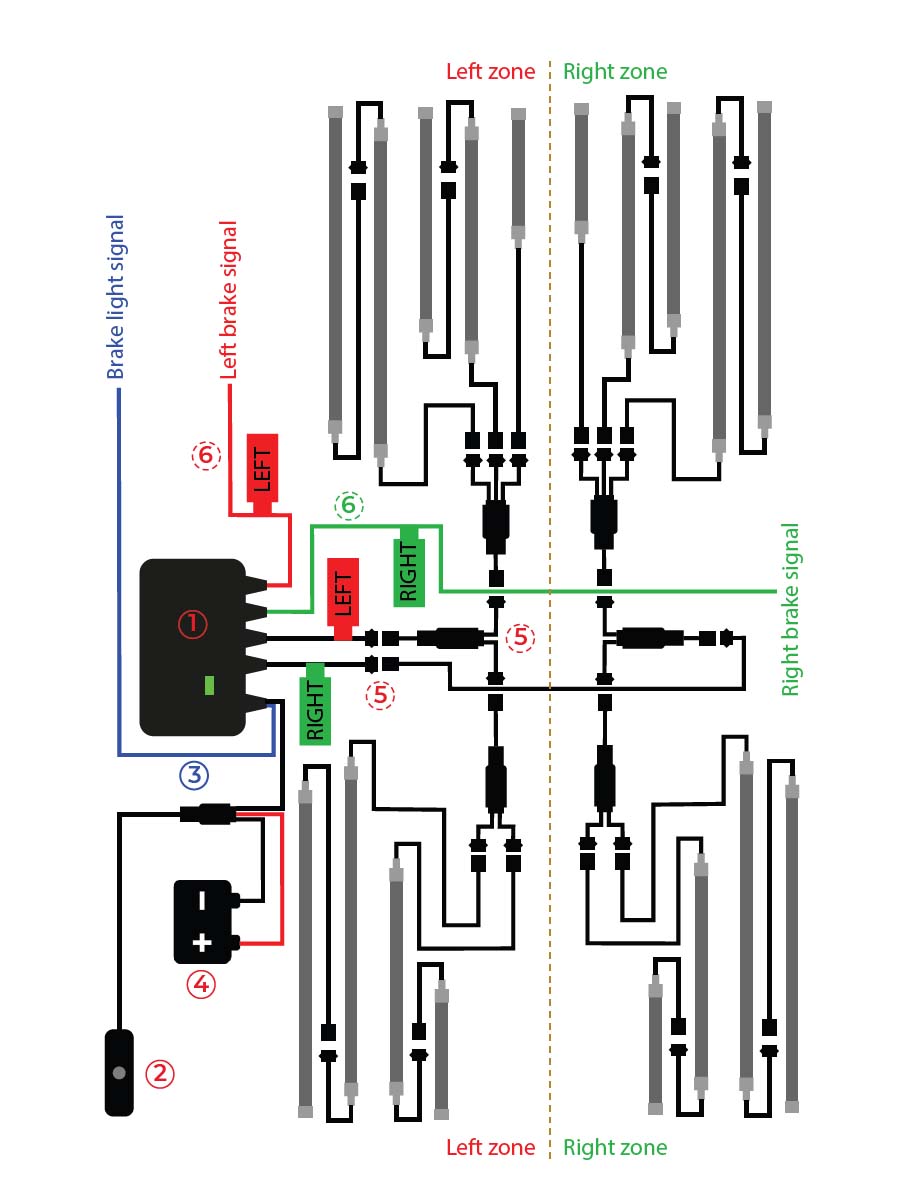
Here is a list of components indicated with numbers for the wiring diagram.
① Control box with brake and turn signal features
② Kill switch for turning ON/OFF
③ Signal wire for brake light feature
④ Battery for power supply DC 12V
⑤ 4-Pin wires for LED strips of left & right zones
⑥ Signal wires for left & right turn features
- The critical point for understanding this wiring diagram is the parts marked with numbers ⑤ & ⑥.
- They divide the LED strips into 2 zones.
Below are 2 key points.
- A signal wire and its 4-pin wire for LED strips must on the same side.
- Otherwise, LED strips blink for an opposite direction.
Use a 1-2 way splitter to divide LED strips of the same side into 2 parts.
One part for the front, and the other for the back.
This package comes with 8 daisy-chain LED strips.
- Each has 2 connectors on its 2 ends for continuous connection.
- You won’t need to begin each LED strip from the control box.
- Make good use of this design to reduce wires’ bulkiness.
This package comes with 4 x 1-2 way and 4 x 1-3 way splitters.
- You don’t have to use all these splitters.
- Just use any of them which are good for your install.
- If you don’t use a specific connector, leave it alone.
- Tie it or cut it off and use electrical tape to seal it.
7. Alternative Layout Concept
The wiring diagram above is one of the possible layouts.
You can decide whether to follow it or try another one.
1). Simplify installation
- Put 2 x 12.7” daisy chain LED strips under the tank and extend to the front wheel from there
- Run the wires under the tank for a cleaner look
- They should be able to save you time because you may not need to take the tank off
2). Use extension wires
If the wire of a strip is not long enough to reach your expected spot, add an individual extension wire.
The package comes with 6 x 24” extension wires, but to simplify the concept, the wiring diagram doesn’t show them all.
3). Additional extension wires & splitters
Motorcycles have different sizes and LED strips are flexible to install.
A size doesn’t fit all models.
It’s good to map your layout and check wires’ length before installation.
8. Turn Signal Feature
This LED strip kit comes with an additional turn signal feature.
It works with the original turn signals of your bike and makes your turns more noticeable.
Connect the red & the green signal wires – marked ⑥ from the control box – to the wires after the relays for the orignal turn signals of your bike
Consider using 2 stripping-free connectors to splice the 2 wires to the original turn signal wires
The red & the green labels on 4 of the wires – coming out from the control box – will help you split your installation into 2 zones – the left & the right.
You must match a signal wire and its zone to ensure the turn signal feature will work correctly.
The pigtail wire – from the control box with a red lable LEFT – should be installed on the same side with the red wire also labeled LEFT.
In this way, all the LED strips on this side will blink amber when you apply the turn signal.
And then install the pigtail wire with a green label RIGHT and the green wire labeled RIGHT for the other side.
- The purpose of the LEFT & RIGHT labels is to help you distinguish the wires.
- The only importance is to make sure you pair a signal wire and a 4-pin wire for LED strips on the same side.
- Take either side of your bike as the left zone or the right zone, as long as it’s good for your install.
9. Brake Light Feature
InfiColors M18r-T has a brake light feature, which is optional.
And it has 3 lighting styles for this feature.
You can decide whether to use or which one to use.
1). Solid red lighting style
By default, all LED strips come solid red when you squeeze the brake after you connect the blue wire to the signal wire for your rear brake.
Pick a point on the wire leading to your rear brake light after the switch, NOT before it
Two videos on YouTube may help you find where is the wire leading to your brake light
Harley Brake Switch Diagnosis
Harley Davidson Maintenance Tips – How to Test a Rear Brake Switch
After you find the wire for your rear brake light, use a stripping free connector to connect the blue wire
After you connect the blue wire, the LED kit will go red immediately when you squeeze the brake
2). Blinking red lighting styles
Now it has 2 optional flashing/blinking styles built in the circuit.
- The 1st one is to make LED strips keep flashing as an additional brake signal, and you can adjust flashing speeds using the brightness button
- The 2nd one is to keep LED strips flashing in a combination of flashing and solid red: flash 3 times in 1 second + stay solid red for 2 seconds (not adjustable)
Take these steps to check the 2 new flashing brake light styles:
- Squeeze the brake and keep all LED strips working in the brake light mode
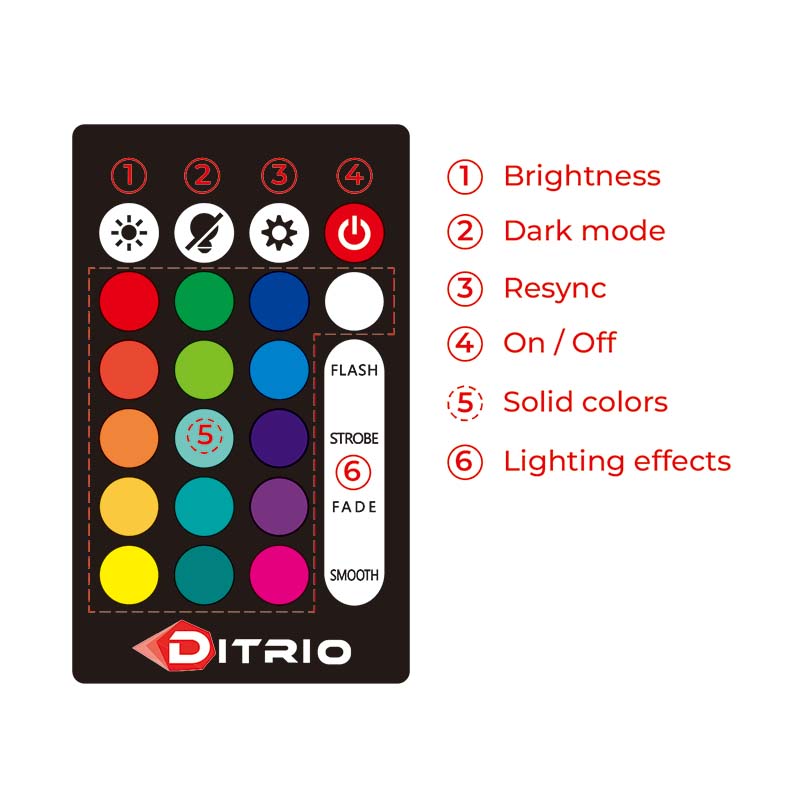
- Meanwhile, use the 24-key remote and press the button for music mode (the 3rd button from left to right of the 1st row)
- Press this button one time for one lighting style
- Release the brake once you decide which lighting style to use
- The circuit board will remember your choice automatically (but don’t turn the system off by the kill switch until 15 seconds later – the circuit board needs time to save it into the chip)
- If you are not sure, squeeze the brake again, and you will see which style you have chosen
Feel free to contact DITRIO if you need help about how to choose the blinking brake light feature.
Especially, if the description above is difficult to understand, feel free to contact DITRIO for a brief video for demonstration.
If you prefer not to install the brake light feature, you don’t have to connect the blue wire. Just zip and tie it, or simply cut it off.
can i pair with my cell phone
Hi Harry,
I’m sorry to tell you our lights cannot control by phone Bluetooth.
Actually, we sold the Bluetooth control LED kit two years ago.
But the Bluetooth control is not as stable as we wish.
We still keep the RF remote control for now.
RF control can penetrate metal to control.
The metal material affects Bluetooth control, this is the most challenging problem we need to fix it.
We are still working on the Bluetooth control, and when we have Bluetooth control, I’ll let you know.
Just tell me anything you need, I love to help you.
-Maxine from the DITRIO service team
Hello I recently bought the Ditrio LED light set with the light strips from my son. When I got home I realized that I’m gonna need the extentions , splitters, and remotes. Could you please help me locate these items so I can use my light straps? I’m so excited and have watches several videos about these awesome lights I just wish I at least had a way to connect all the lights to the main power supply because I have that and can plug in one at a time. So to recap , I have 6 led light strips ( what kind of glue strips would you recommend?) And the main power supply that has the positive and the ground wires . I believe what I’m needing is the splitters, extentions, key fob and remote. Would it be cheaper to buy an extention kit than to purchase these items separately? Thanks so much for your help we are all very anxious to get these working. Also can I use my android smartphone to control the lights until I can get a remote? If so which app should I get? Thank you so much!!! Loria Scott
423-297-5326
2461 Lakewood Drive
Johnson City Tennessee 37601
[email protected]
Hi Loria,
First, thank you so much for liking our product!
I have a few questions I need to know so I can recommend a suitable package or customize package for you.
Here we go:
1. May I know what your model is?
2. Does your LED strip is daisy chain or single-way? (It could be better if can take a picture)
3. Sorry to tell you that we do not have Bluetooth smartphone control the control box at present. It can only control with the remote.
4. If I understand correctly, you have 6pcs LED strips and a control box in hand now, right?
If possible, please take a picture of the control box as well. Let me know how I can help.
I will look forward to your response!
-Maxine from the DITRIO service team
Could I possibly get a replacement fuse? I’ve never seen a fuse like this and mine stopped working.
Hi John,
Yes, I will send you a new one to replace it. Pls check the email.
-Maxine from the DITRIO team
I would like to get 3 extra replacement fuses, mine is out right now. How do I get them. Thanks
Yes, I’ve sent you an email,pls check it.
-Maxine from the DITRIO team
Bought the 18 strip multi zone kit. Wired up easily enough, turn signal and brake option are the reason I chose this set. I have only used the lights twice and the two sides are no longer synced. One side is purple while the other is blue. Or blue and green. I have tried the remote but only the right side is what I actually pick. I have checked the connections and they all seem tight and not damaged. What do I need to do?
Hi Josh,
It could be the left side connector have a problem or the control box. Please check the email for more details.
-Maxine from the DITRIO team
Hey im actually having the same issue and my remote will no longer pair either
Hi Aj,
This is Lucy from the DITRIO team.
Thanks for buying our LED kit.
It may have a problem in the control box.
Please try the following steps:
– Replace a spare fuse to the fuse box.
– Connect a single LED strip to the control box directly.
– Bypass both the 1-2way and 1-3way splitters.
– Give the power supply to the control box again and see how it works.
If the individual LED strip works correctly, the problem comes from wires, LED strips, or connectors.
If an individual LED strip won’t work in this way, it means the control box itself has problems. I will help you fix the issue.
Please let me know what is going on after the test. Thank you.
-Lucy from DITRIO team
Still having the same issue even with just one led strip plugged in
Hi Aj,
I’m sorry to hear that the LED kit still can’t work.
I’ve sent you an email and provide solution for you, please check it.
-Lucy from DITRIO team
I have bought many set of the 18 pcs lights, I’ve also installed many on friends bikes. I’m having a issue where 1 side will turn on green while the rest go white then they all shut off. I’ve checked all I could and resynced the remote, but nothing is working.
Any help would be greatly appreciated.
Hi Carl,
It could be the control box connection point is getting short. Let me send you a new control box to test it. Please check your email and get back to me.
-Maxine from the DITRIO team
I would like to add a switch. I have lights on top and lights on bottom of a golf cart. Would like switch off the top lights while bottom still works. Then be able to flip the switch back on to light up the top. Can I simply strip the extension wire and add a switch in line?
Hi Josh,
This is Lucy from the DITRIO service team.
First, thanks for buying our LED kit.
It’s not easy to add a switch on the extension wire.
Let me explain why not easy to add on.
There are 4 wires inside of the extension wire, Red/Green/Blue/Black-negative.
You can only splice the black wire and add a switch.
But the wire is thin and hard to add a switch.
But you still can give it a try.
If the wire doesn’t work after splice, I can send you a new extension wire from the OEM factory.
It usually takes about 15-20 days to arrive.
Both the wire and shipping will be free for you.
-Lucy from DITRIO team
Just bought the M12AP and it doesn’t turn on. The main box is flashing blue but the light strips just don’t turn on at all. The kill switch works but again no lights ……..
Hi Andy,
I’m sorry to hear that the lights are not turning on. I’d be happy to assist you in resolving this.
Before we proceed further, I would suggest trying a few troubleshooting steps to narrow down the issue:
1. -Replace the fuse
2. -Connect a single LED strip directly to the control box, bypassing any splitters or connectors.
This will help determine if the issue lies with the wiring, LED strips, or connectors.
3. -Give the power supply to the control box again and observe if the LED strip works correctly when connected directly to the control box.
If the individual LED strip works fine with the direct connection, it suggests that the problem may be with the wires, LED strips, or connectors.
On the other hand, if the LED strip still doesn’t work when connected directly to the control box, it indicates that there may be a problem with the control box itself.
In that case, I will assist you in resolving the issue with the control box.
Please let me know the results after performing these steps, and I’ll be glad to provide you with further assistance.
-Lucy here from the DITRIO team
So I recently just bought a bike with the M18 and the guy before me lost the remote to it and I was wondering were I can get a new remote because I’m not seeing them anywhere on the website?
Hi Drake,
I’m sorry to hear the remote lost.
To resolve this, I will send you a new remote from our factory.
Could you let me know it is a key remote or 24-key remote?
And you won’t need to return anything.
Both the new package and shipment will be free of charge for you.
Please check your email for further instructions on how to proceed it.
-Lucy from the DITRIO team
I got it all working with turn signals and normal. But when I turn on the brake control on the app my lights stay red (or whatever brake setting). I plugged everything in correctly it’s just the brake line issue that doesn’t work right for me.
Hi Josh,
If the LED strip stays red and won’t change color with the remote after braking, check the brake light wire connection.
One common mistake is connecting the blue wire to the wire that leads to the daytime running light.
This can cause the lights to stay red.
-Lucy from the DITRIO team
I have lost the remotes. May I purchase replacements?
Hi Kyle,
I’m sorry to hear that the remote was lost.
To resolve this, I will send you a new remote to replace it.
And you won’t need to return anything.
Both the new package and shipment will be free of charge for you.
Please check your email for further instructions on how to proceed.
-Lucy from the DITRIO team
I have the 18-piece set on a 2014 wide glide and the main reason I like this set is the break and turn features but when I hook up the turn singles and the brake when I hit the brake, they turn amber instead of red the wires going to the back tail lights use the same wire as turn or brake can you tell me what I might can do or get to fix this problem
Hi Sir or madam,
I’m sorry to hear about the light kit issue.
It seems like the brake light wire connections may be incorrect.
It’s possible that the turn signal wire is mistakenly connected to your brake light.
Please make sure the red wire connects to the left turn signal while the green wire should be connected to the right turn signal.
Lastly, the blue wire is meant to be connected to the rear of your brake light.
-Lucy from the DITRIO team
Thank you for the replay. I made sure all of that was correct. The back taillights use the same wire for the break or turn signal on the bike, so do I need to connect the turns in a different place? Also, one of my LED strips went bad on my bike. When connected in line, one of the long ones went to purple instead of the red or amber LED. So, when I disconnected it, all the rest worked as they should on that side
Ok, so is there anything that can be done about the lousy LED on my bike I haven’t even had that set on my bike, but about three weeks and it stays on purple when I use the break or tuns
Hi Chadwick,
The LED strip may have a short.
To assist you better, I will send you a replacement LED strip from our factory.
Meanwhile, I’ve sent you an email about how to connect your turn signal wire.
Please check your email.
-Lucy from the DITRIO team
I’m working on someone’s GoldWing m/c who installed a Ditrio lighting kit. Using the remote the light strips seem to function correctly. However, if they are turned off, any noise will cause the light strips to flash. For example a cough, a clap of hands, or the touching of a tool on the frame. Is that normal? Are they supposed to operate like that?
Hi Greg,
It sounds like the light strips may be in music mode, which causes them to flash in response to sound or noise.
This feature is designed to create a dynamic and interactive lighting effect.
-Lucy here from the DITRIO team
I have set up all lights and have them working as they should other then turn signals. They were working for 1 trip out about 2 miles now they just stay solid yellow when using turn signals. They go back to normal colors after shutting signals off. Just don’t blink.
Hi Josh,
In this case, the control box may have some issues.
I will send you a new control box to test.
Please check your email.
-Lucy from the DITRIO team
I added extra light strips and either only half light up or not at all
Hi Olen,
Before I assist you further, could you provide me with your Amazon order ID?
This will help me ensure the light kit model you have purchased.
If you don’t have the order ID, please take a pic of your control box and remote.
I’ve sent you an email to explain how to proceed; please check it.
-Lucy here from the DITRIO team
good morning my mother before she passed gifted me the m18r-tk light set i dont think she really knew what she was buying i dont have a bike but i was going to try to use them anyway ( last thing she got me before she passed) so im going to try installing on my silverado and id like to use my head light as the signal is it even possable and one more question is there a way to make them scroll then go solid sorry for the long message….
Hi Nick,
I am deeply sorry to hear about the sad news. It’s touching to know that the light set holds such sentimental value for you.
Unfortunately, the M18r doesn’t have a scrolling feature, only solid colors.
To address your desire to use the headlight as a turn signal, it might not be feasible due to the wattage requirements.
However, you could connect the signal wire to the front turn signal light of your Silverado for function.
-Lucy here from the DITRIO team