1. Packing List
Please check the items inside your package before installation.
1). 2 x 12.7” double-sided LED strips
2). 2 x 8.7” double-sided LED strips
3). 2 x 8.7” single-sided LED strips
4). 2 x 4.7” single-sided LED strips
5). 3 x 1-2 way splitter with fast locking connectors
6). 2 x 24” extension wires with fast locking connectors
7). 1 x DC 12V control box with a kill switch
8). 2 x RF remotes (Key fob + fl at remote)
9). 1 x double-sided adhesive for the control box
10). 1 x velcro stickers for remotes
11). 1 x T stripping-free connector
12). 2 x ring terminals
13). 1 x instructional booklet
2. Test before Installation
After you unbox the package, do a lighting test to make sure everything is fine.
Find a power source with DC 12V (typically the battery of your bike has this voltage)
Connect the red wire to the positive and the black wire to the negative of your power supply
LED strips will go on after you press the push button on the control box for the 1st time
After you confirm everything works correctly, simulate installation to see whether wires are long enough
3. Specifications & Parameters
1). Material: Extruded silicone for LED strips, waterproof IP68
2). LED model: SMD RGB 5050
3). Input voltage: DC 12V (Workable between 10-15V)
4). Wattage: Maximum 50 watts
5). Warranty: 2-Year limited warranty
6). Control method: RF remotes, effective within 30 feet
7). Working temperature for all parts: 30 °F – 120 °F
To save space, we’ve made the circuit board as small as possible.
This limits how many LED strips you should connect. If you want to add more LED strips to a single control box:
Add less than a total number of 36 additional LEDs (regardless to how many strips) to guarantee the performance of a standard design.
4. Tips for Applying Double-Sided Tapes
It’s not difficult to stick LED strips, but you can use the tips below for obtaining an optimum adhesion.
1). Surface preparation
Clean the bonding surfaces before application (you can consider a solvent of IPA/water mixture)
Adhesion promoters significantly improve initial and ultimate adhesion, and you can consider 3M Adhesion Promoter 111, 3M Tape Primer 94
Ideal application temperature: 70°F to 100°F (21°C to 38°C)
Minimum application temperature: 60°F (15°C)
Use a heat gun (hot air gun) to warm up tapes and the target surface if it’s too cold
2). Apply pressure and wait
As a pressure-sensitive adhesive, apply pressure for 3-5 seconds to develop be er adhesive contact and improve bond strength.
Better to wait for 24 hours after application before riding again; the tapes will gain bond strength dramatically.
• 50% of the ultimate strength after 20 minutes
• 90% of the ultimate strength after 24 hours
• 100% of the ultimate strength after 72 hours
5.Water Resistant and Waterproof Grades
The water-resistant ability varies depending on a specific part.
Generally speaking, the LED strips and control box can be exposed to the rain and washing spray.
1). LED strips (Waterproof, IP68)
Made from extruded silicone, and they work even if you dip them into water.
2). Fast locking connectors (Waterproof, IP67)
You can expose the wires and 1-2way splitters to liquids and humidity, like the rains and spraying water.
3). Control box (resistant to water & humidity)
The circuit board has a layer of conformal coating on its surface
The gray push button has been sealed with glue inside
If your bike doesn’t have anything to cover the control box, better to install it vertically.
The wire harness is rubber and slightly flexible.
The 2 wires from the control box may swing during riding.
Keeping the control box vertical can help the control box avoid liquid entrance in the best way.
5) RF remotes (NON-water-resistant)
Please keep them away from liquid water and humidity.
6. Wiring Diagram
Please refer to the conceptual diagrams below.
They demonstrate a typical install.
Primarily, they demonstrate the position and relation among different parts.
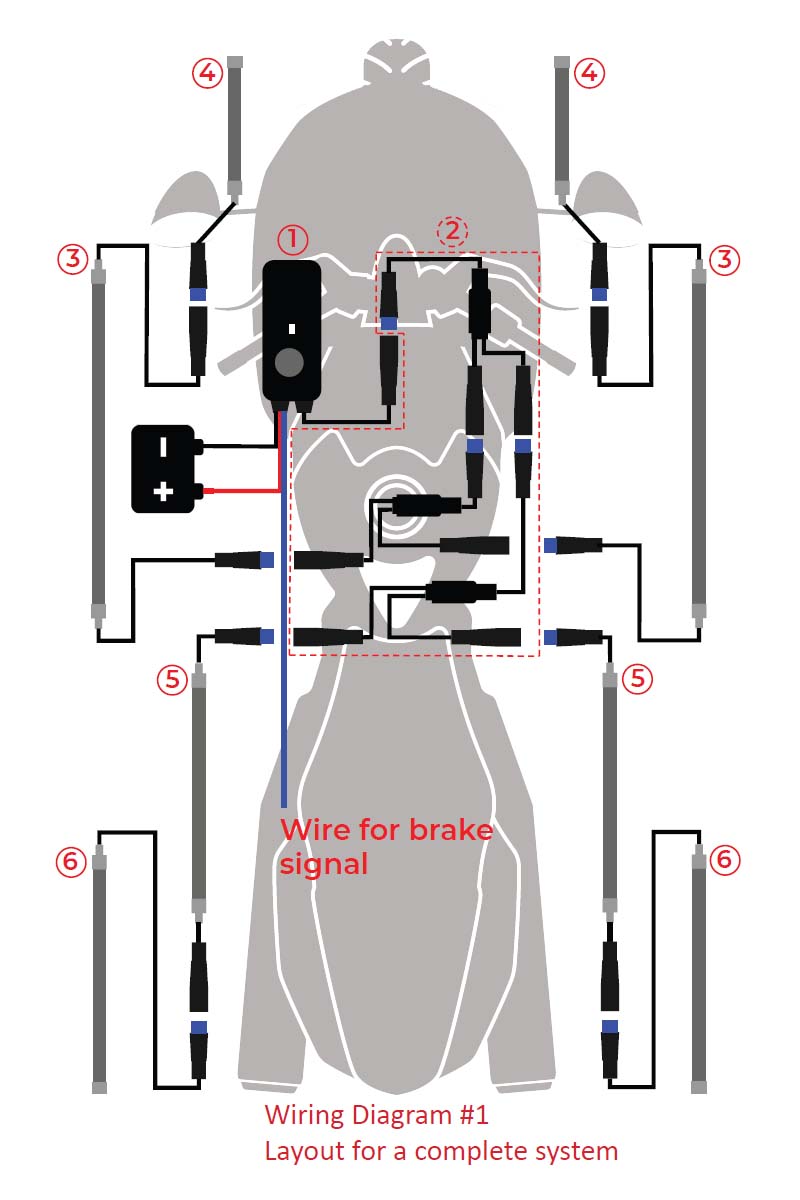
Here is a list of components indicated with numbers.
① Control box with a built-in kill switch (gray silicone button)
② 1-2 Way splitter x 3 (all the same design)
③ 12.7-Inch daisy-chain LED strip x 2
④ 4.7-Inch LED strip x 2
⑤ 8.7-Inch daisy-chain LED strip x 2
⑥ 8.7-Inch LED strip x 2
The critical point for understanding these wiring diagrams is the part marked number ②, which includes 3 x 1-2way splitters.
Getting clear about this part should help you understand how to separate LED strips for the front and the back of your bike.
The 1st one is for splitting power supply into 2 directions – the front and the rear
While the 2nd and 3rd ones are for splitting LED strips for your bike’s left and right sides
This package comes with 4 daisy-chain LED strips, and each has 2 connectors on its 2 ends.
Thanks to this feature, you won’t need to begin each LED strip from the control box.
The daisy-chain design reduces wires’ bulkiness.
- 2 x 8.7 inches, with 6-inch wires for 2 sides
- 2 x 12.7 inches, with 6-inch wires for 2 sides
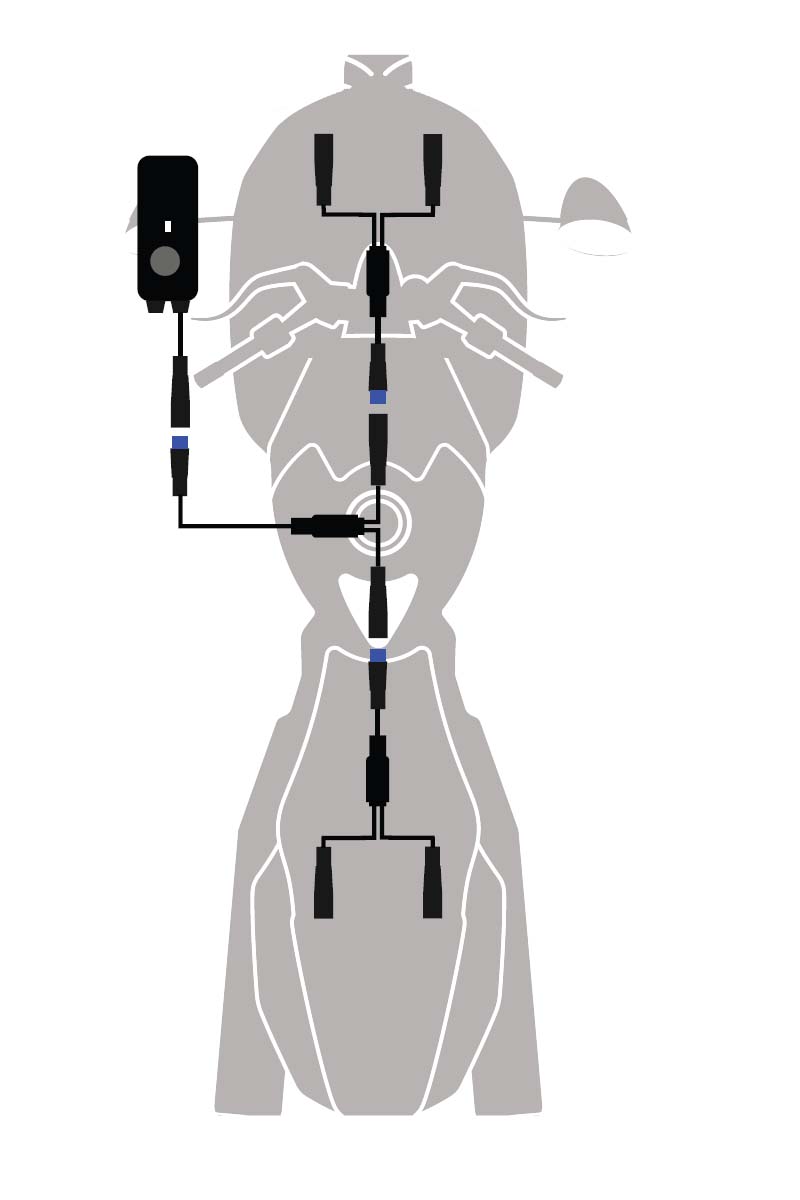
1). Typical Layout
The diagram on page 8 is a default installation concept. Quite a few bike owners have confirmed it’s a good idea.
Put 2 x 12.7” daisy chain LED strips under the tank and extend to the front wheel from them
Run the wires under the tank for a cleaner look
They should be able to save you me because you may not need to take the tank off
Use 2 x 8.7” double-sided strips for the chassis of your bike
That would be a good setup for the back end of your bike
This layout is a typical concept, and it focuses on the engine block.
Each 12.7-inch daisy-chain LED strip has 18 LEDs
It produces the most light among all the 3 sizes
2). Use Extension Wires
If the wire of a strip is not long enough to reach your expected spot, add an individual extension wire.
• The wires’ length is decided based on feedback from bike owners, who helped us test prototypes.
• The total number of prototypes was 20 packages, and the overall opinion was good.
3). Additional Extension Wires
Obviously, motorcycles have different sizes and LED strips are flexible to install, without a size that fits all cases.
It’s good to map your layout and check wires’ length before installation.
If the extension wires in the package are still not long enough, please contact DITRIO for additional extension wires.
This type of wires is available as part of after sales service.
7. Alternative Layout Concepts
Technically speaking, it’s possible to reverse the layout for the front and the rear if you prefer. This won’t have any negative impact on its functions and reliability.
You can do it if you prefer to highlight a different spot. These wiring layouts are possible too.
Put 2 x 8.7” daisy chain LED strips under the tank
And put 2 x 12.7” ones for the chassis instead
Use 2 x 4.7” LED strips for the rear
And use 2 x 8.7” single-ended ones for the front fork
8. Brake Light Feature
InfiColors M8r has a brake light feature, which is optional. All LED strips come on red when you squeeze the brake after you connect the blue wire to the signal wire for your rear brake.
Pick a point on the wire leading to your rear brake light after the switch, NOT before it
Two videos on YouTube may help you find where is the wire leading to your brake light
• Harley Brake Switch Diagnosis
• Harley Davidson Maintenance Tips – How to Test a Rear Brake Switch
After you find the wire for your rear brake light, use a stripping
free connector to connect the blue wire
After you connect the blue wire, the LED kit will go red immediately when you squeeze the brake
If you prefer to install the LED strips for basic lighting and not to install the brake light feature, you don’t have to connect the blue wire. Just zip and tie the blue wire, or simply cut it off.
9. Push Button for Preventing Battery Drain
When you turn off the LED strip kit by either remote, all the LED strips go off and don’t use battery anymore themselves.
However, the control box is still working, and uses approximately 12mA to stand by.
The purpose is to receive RF remote’ signal whenever you use the LED kit again.
It’d be better if you press the grey push button to turn off the control box, whenever you don’t use the LED strip kit:
It’s like cutting off power supply using your scissors.
The control box (the whole system) no longer uses any battery.
Approximately, this control box may use 70% of a 5-Ah lithium battery after 30 days (depending on the health of the battery).
It’d be good to use the grey kill switch to turn off the LED kit when you don’t ride your bike, especially for days and weeks. This helps you prevent battery drain issues.
10. Self-Protective Mechanisms
The circuit for M8r has 2 essential features to protect itself. They assure that it won’t have issues in abnormal conditions.
The control box has an LED indicator on its front cover. You can check its working status by the indicator’s colors.
Green: the system is working correctly when it blinks green.
Red: the system has an issue when it blinks red rapidly.
• The red light blinks faster than the green, and you can judge by blinking speeds too.
1). Short Circuit Prevention
Sometimes the LED strips may have short circuit somewhere after correct installation. There are 2 typical causes based on our experience with bike owners.
Wires are damaged during riding
Wires are melted after they touch the hot surfaces of the engine or the exhaust
We’ve built a protective feature in the circuit board. A short circuit or excessive voltage won’t burn any components.
The circuit cuts off power supply automatically, and the LED indicator will warn you by blinking red.
If you can’t turn the LED strip kit on and surely it has power coming in, then check the LED indicator on the control box.
LED strips remain off, and the LED indicator keeps blinking RED quickly. That means your system has a short circuit somewhere.
LED strips will come on, and the LED indicator will flash slowly green a er you eliminate the shortcircuit.
2). Reverse Connection Protection
This circuit board has a protective feature against reverse connection, which usually burn components on circuit boards, if they don’t have a built-in protective design.
Our circuit has a protective design against reverse connection in it.
If you connect the red wire to the negative of your battery and the black wire to the positive, it won’t burn or damage the circuit or anything.
LED strips and the indicator on the control box won’t light up.
If you see this, check the red & the black wires’ connection.
Make sure to connect the red wire to the positive, and the black wire to the negative of your battery, and it will work.
11. RF Remotes
This LED strip kit comes with 2 remotes – a 24-key panel remote and a 4-key keychain fob. Both are RF technology.
You don’t need to point them at the control box directly
You can hide the control box and the signal still works
1). 24-Key Panel Remote

① Brightness: press this button to increase or decrease brightness
② Dark mode: strips go off until you press the On/Off button again
③ Resync: work with the brightness button for resyncing remotes
④ ON/OFF: turn all LED strips on/off
⑤ Solid colors: set all LED strips in a preset solid color
⑥ Lighting effects: set all LED strips in colors of specific patterns
• Flash: colors shine brightly and briefly
• Strobe: colors flash intermittently
• Fade: colors gradually grow faint and disappear
• Smooth: colors cycle smoothly like breathing lighting effects
This package comes with a Velcro sticker for this 24-key remote
Use it to position this remote somewhere accessible
The primary benefit of the 24-key remote is that you can see all colors directly on the panel, don’t need to cycle for finding a color.
The 24-key remote offers more functions than the 4-key one, since it has more buttons for programming.
For this reason, it’d be better to keep it, even if you prefer the 4-key one due to its convenience.
A useful tip for increasing batteries’ service hours:
Press remotes’ buttons quickly for adjustment
Do NOT press and hold any button
Short presses use battery dramatically less than long presses
Dark Mode
If your state’s traffic code doesn’t let you keep the LED strips on during riding, then you can consider using the Dark Mode.
LED strips will only turn red when you squeeze the brake
They remain off after you release the brake
Install the LED strips as below for the Dark mode:
Make sure to connect the blue wire to the wire leading to your brake light
Press the button for Dark Mode on the 24-key remote
To avoid mistouch, you won’t be able to change colors or lighting effects when the LED strips in the Dark Mode
You will need to press the ON/OFF button to turn it on again
2). Key-Chain Fob
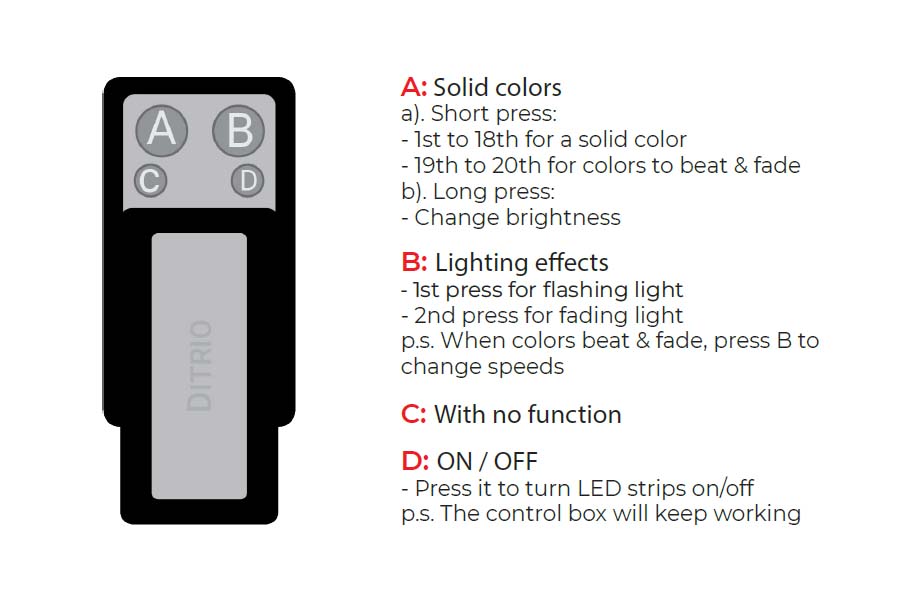
This LED strip kit also comes with a key-chain fob with 4 buttons. Its major benefit is the smaller size and you can carry it with your keys.
The key-chain fob offers less features than the 24-key remote, since it has fewer buttons for programming. Use the 24-key remote if you find a feature not available with this key-chain fob.
First of all, the button D is for ON / OFF
After you turn the LED strip kit on, use buttons A and B to choose your favorite lighting.
There are 18 preset solid colors for you to choose:
- Red, Dark Blue, Purple, Green, Yellow, Ice Blue
- Orange, Purple, Light Green, White, Cyan, Light Purple
- Blue, Ice White, Warm White, White, Ice Green and Yellow Green
You can adjust the lighting effects based on these solid colors:
To change the brightness, press and hold key A for 3 seconds
After you press key A to put lights in beating or fading mode, press B to change speeds
12. Sync & Resync Remotes
If you lose a remote, you can get a new one from DITRIO and resync it to your control box. You don’t have to replace the control box.
Procedures to resync either remote:
1) Press the gray push button to turn on the control box (not to press the ON/OFF button on a remote)
2) The LED strips will come on immediately, and then go off themselves
3) Next, they will come on again automatically and the first 3 seconds will be the time for you to resync either remote
- For the 24-key remote, press the key 1 (for brightness) first, and then key 3 (for resyncing), and LED strips will blink if the remote resyncs correctly.
- For the 4-key fob, press the key A first and then the key B, and LED strips will blink if it resyncs correctly.
Please do not reverse the key-pressing order or press them repeatedly if you miss the resyncing time frame.
Instead, turn off the control box by the push button and try again.
Each maker has parameters of their own for circuits and remotes.
It’s very likely that you won’t be able to sync a remote from another brand to our control box.
Likewise, our remotes don’t work with a control box from another brand.
For this reason, it’d be better to have these items from the same brand.
I already have the brake feature set to 3 second blinks then solid for 3 seconds, how do I change that to solid red when I apply the brake? Thanks in advance.
Hi Alan,
Yes, you could use the 24-key remote and press the button for music mode (the 3rd button from left to right of the 1st row). It can change to stay solid red.
-Maxine from the DITRIO service team.
When i first turn on the lights with the on/off switch on the frame of the bike it blinks twice then goes to the color i want it to be and the blinks are white then it goes to turquoise which is the color i want when i hit the on/off switch. How do i get it to just go to the turquoise color when i first turn the system on from the on/off switch. I also bought the bike with the system already on it and no 24 button remote only the 4 button key fob remote.
Hi Michael,
Yes,you need a 24-key remote easier to control the color. Then you can directly choose turquoise.I can send you a new one. Please reply to the email I just contacted you.
-Maxine from the DITRIO team
I bout mine and can’t find the 24 key remote. I have the fob, is there anyway I could get the remote ? Thanks guys
Hi Mark,
Yes,I can give you a new remote. Please check the email for more details.
-Maxine from the DITRIO team
Have no light was working then add some light now nothing I have took the main wire off and tested have power to one other three nothing whish I could post pic but any help would be appreciated
Hi Lance,
I apologize for all the issues.
Please check the e-mail, and I have sent the solution to you.
-Lucy from DITRIO team
When will the iPhone app be useable? Is that a product coming out?
Hi Eddie,
It’s Lucy answering from the DITRIO service team.
Thank you for your interest in our underglow LED kits. I understand you are asking about an iPhone app to control the lights.
The LED kits we currently sell do not include app control functionality. We do have plans to release an app-controlled version in the future, but we do not have an exact timeframe for when that will be available yet.
The current LED kits use a wireless remote control to change colors, modes, brightness etc. The remote allows you to adjust the lights easily, but does not provide app control.
Please let me know if you have any other questions! I’m happy to provide more details about the capabilities of our current LED kits. We appreciate your patience as we work on developing an app-controlled version. I will be sure to notify you when we have an estimated release date for the app integration.
Thank you again for your inquiry. Please don’t hesitate to reach out if you need anything else.
-Lucy from DITRIO service team
Any update on timeframe for connecting to app ?
Hi Davon,
This is Lucy from DITRIO team.
Thanks for your interest in our LED kit.
We’re currently preparing for the app launch, scheduled for the 15th of next month.
We understand your excitement about connecting to the app, and appreciate your waiting patiently.
Once the app is ready, we’ll provide you with detailed instructions on how to connect and utilize its features effectively.
If you have any questions or need assistance, our customer support team will be more than happy to help.
-Lucy from DITRIO team
The brake light good. I turn the lights on. Then after a few seconds they turn off. The brake lights work. Then a while later they turn on but then off again
Hi Vicente,
Please check the e-mail, and I have sent the message to you.
-Lucy from DITRIO team
Hello,
one of my light strips came off the under chassis it was dragged until the strip was destroyed. I ordered a new strip and replaced it but the light don’t come back on. I have tried the main button tried both remotes and it does not come back on.
Hi Earl,
This is Lucy from DITRIO team.
I apologize for all the issues we have.
It may have a issue in the control box or the kill switch.
Please try the following step:
– Connect a single LED strip to the control box directly.
– Bypass both the 1-2way and 1-3way splitters.
– Give the power supply to the control box again and see how it works.
If an individual LED strip won’t work, please replace a spare fuse with the fuse box and see what happens.
If the light still can’t work, I will help you fix the issue.
Please give me an update after test.
-Lucy from DITRIO team
I cannot find the remote anywhere how can I obtain another?
Hi Ryan,
I understand that you’re having trouble finding your remote. Don’t worry, I’m here to help you.
In order to assist you better, could you let me know the specific model of the remote you need?
This will help me provide you with accurate information on how to obtain a replacement.
-Lucy from the DITRIO team
I bought the 18 light set and no where does it have a diagram of what light goes where.
..HELP
Hi Rodney,
Unfortunately, we do not have a specific diagram available for this product at the moment.
However, you can install the LED kit based on your preference.
Just ensure that it is placed away from heat sources, such as the exhaust, to prevent any potential issues.
-Lucy here from the DITRIO team
What is the size of the wire used with the LEDs?
Is it 24g?
Hi Herbie,
Thank you for your inquiry.
The wire used with the LEDs is AWG26, not 24g.
-Lucy here from the DITRIO team
When I turn unit on it only flashes blue when I first installed it it worked great now only blue plz help
Hi Andy,
The remote may lose its frequency with the control box.
Before I assist you further, could you provide me with your Amazon order ID?
This will help me ensure the light kit model you have purchased.
-Lucy here from the DITRIO team
When I turn unit on it only flashes blue when I first installed it it worked great now only blue
Everything was working fine , I changed the battery and now all my colors dont work. I push the red button, red comes on, I push green, its light blue. I push blue, nothing changes, still light blue. White works. Orange not the right color.
Hi Tommy,
Thank you for reaching out to us!
In this case, the control box may have some issues.
Could you try to connect a single LED strip to the box directly, and see if it works correctly?
If this single LED strip still doesn’t work correctly, I will send you a new control box to test.
Please let me know the result after testing.
-Lucy here from the DITRIO team